Prenatal Yoga & Movement Blog

Left Side Lying Rest/Savasana: 3 Benefits & How to get the Most from It

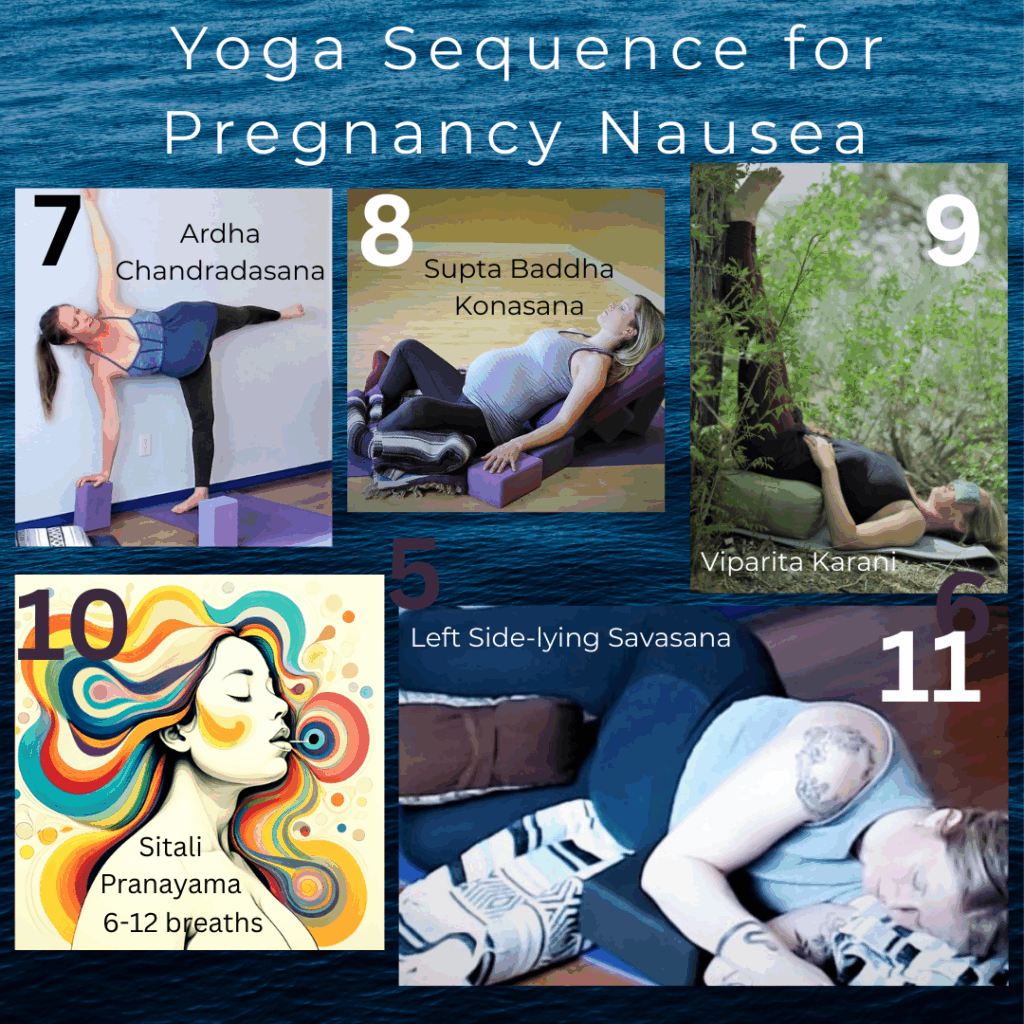
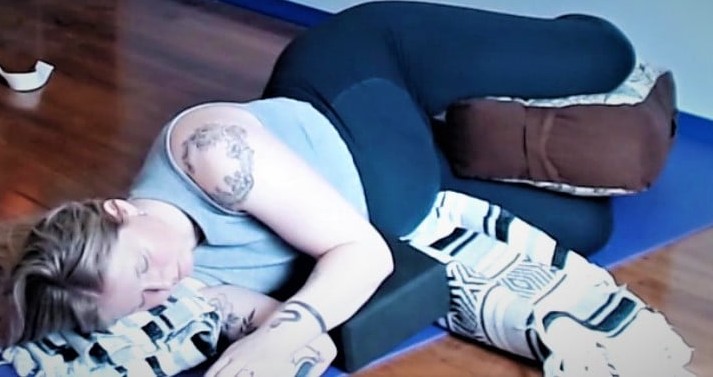
Often at the end of a prenatal yoga class, I’ll walk participants through the most beneficial set up for Left Side Lying Savasana (Corpse Pose). This posture is a wonderful way for a pregnant person to be able to rest deeply and rejuvenate their hard-working body.

The first benefit of Left Side Lying Savasana is deep rest, which allows the pregnant yogi to drop into the rest and relax parasympathetic state. This state of relaxation supports the process of pregnancy in numerous ways including allowing the hormones of pregnancy and labor to be more readily available and accessible since they’re not competing with the hormones of stress.

Left Side Lying Savasana several other other benefits as well. In order to achieve these added benefits, it’s important to take into consideration some specific alignment points. These include:

  • Placing some blankets or pillows under the head so that her neck is in good alignment. That means not too much or too little support under her head. Too much support will tilt her neck up and too little will tilt it down. Make sure that it’s just enough to keep the neck straight or parallel to the floor.
  • Positioning a pillow or bolster under the yogi’s top arm so that their arm isn’t falling too far down toward the ground and pulling their shoulder forward, which may create torsion in the spine. The pillow under their arm should roughly keep their shoulders stacked. If they didn’t have the support here, their top shoulder could be pulled forward for as long as they’re in this position, which could be hours throughout the night. When the top shoulder is pulled down, as described, it will likely place strain in other regions of the body, like the neck and thoracic spine. A large piece of labor preparation deals with cultivating as much balance in the body as possible, which includes keeping the entire spine as straight as possible while keeping in mind its natural curves.
  • Placing a blanket underneath the pregnant belly. This added prop helps to alleviate the tension in the body, including the spine, from the weight of the baby, uterus, & fluids being pulled down by gravity towards one’s bed or floor. Supporting the weight of the pregnant belly while side lying becomes particularly important in the 3rd trimester.
  • Tilting the top hip slightly forward so that if one were imagining a flashlight shining from their belly button that it would be slightly angled down towards the floor. This can help with fetal positioning, which I will explain in greater detail in the next section of this article.I encourage you to make any tweaks so that being in this position feels great.

Now that the alignment of Left Side Lying Savasana is set-up, let’s look at the other two major benefits of doing this posture as much as possible when resting and sleeping.

2 Benefits Beyond Relaxation of Left Side Lying Savasana:

  • Supports Fetal Positioning for Childbirth – While countless babies have been born just fine in other fetal positions, beginning labor with the fetus either in LOT (left occiput transverse) or OA (occiput anterior) many times may help labor begin and progress more smoothly, and births that begin in fetal positions may also be easier on the baby. The LOT position is when the back of the baby’s head is facing to the left side of the uterus, and the OA position is when the back of the baby’s head is facing opposite of the birther’s back, or towards the belly side of the uterus. OA and LOT both improve the baby’s chances of tucking their chin, which helps the presenting part of the baby’s head to be smaller in diameter and more moldable, as their cranial bones can more easily shift and overlap as they’re making their way through the pelvis in childbirth. When the back of the baby’s head is facing towards the birther’s back (OP, occiput posterior) or towards the right side of the uterus (ROT right occiput transverse), they have a much harder time tucking their chin (flexion). When the baby is not able to flex their spine, it makes the part of their head that enters the pelvis first larger in diameter and less moldable in the cranial bones. There is an asymmetry in most uteruses that creates a situation for the baby that makes it more challenging to tuck their chin on the right side of the uterus versus on the left side. Resting and sleeping on the left side may help babies slide into the left (LOT) side of the uterus to tuck their chin, and they may also continue sliding towards the front of the uterus in OA, both excellent fetal positions to start labor. Making sure the top hip of the birther is slightly tipped forward, making her flashlight angle down towards the floor is an important factor to help the baby slide into one of these positions.
  • May Improve Circulation to the Uterus & Support Deeper Rest – Sleeping and resting on the left side may increase blood flow to the uterus by decreasing the pressure on the inferior vena cava (IVC). The inferior vena cava is a large vein that runs along the right side of the body and carries blood from the lower body to the heart. In late pregnancy, the weight of the uterus can compress the IVC to varying degrees, particularly when lying on the back or right side, hindering blood flow. As alarming as this may sound, trust that if you’re sleeping on your right side or back, you’ll wake up if something’s not right and change positions. Your body is smart. Many pregnant people are just fine being on their backs and right sides throughout their entire pregnancies, while others may not feel as well. My suggestion is to begin your rest or sleep comfortably on your left side, and try to be on that side as much as possible, but when you need to turn, do so. The risk of IVC compression is mostly present only towards the end of pregnancy.

Left Side Lying Savasana is a glorious posture in which to enjoy deep and rejuvenating rest and help your baby slide into a birthing position that may help your labor progress more smoothly and quickly. I hope you enjoy it!

Practice Tips for a Safe Prenatal Yoga Practice: Manage the Effects of the Relaxin Hormone in the Body

Pregnancy comes with a range of emotions and physical symptoms that can vary greatly depending on the person. Many of these feelings and symptoms are triggered by the buffet of hormones that flood a pregnant person’s body, one of them being the reproductive hormone Relaxin, . 

I remember as a pregnant yogi that physical sensation that hit me a few weeks into pregnancy that made my body just want to, as the word implies, relax. I had been used to practicing yoga everyday in a way that encouraged the use of muscle energy, or emphasized strong and well-aligned postures, but very soon into my first pregnancy, it was much more challenging to bring strength into the asanas (postures). My body felt like it wanted to disengage from the stronger types of asanas and simply lie down, rest, and stretch. While following that desire to rest and stretch more is useful and encouraged, I also think it’s important to continue a modified version of a yoga practice that includes at least a few of the stronger standing postures so that the pregnant body can maintain some of its strength and stability and overall health and wellness throughout a pregnancy. 

Relaxin is produced by the ovaries and the placenta after ovulation and during pregnancy. Its levels are elevated throughout an entire pregnancy but peak around 14 weeks. Relaxin plays an important role in the 1st trimester of helping to prepare the lining of the uterus for implantation, grow the placenta if implantation occurs, and preventing early contractions and miscarriage by relaxing the uterine muscles. Relaxin also softens the muscles, joints and ligaments during pregnancy to help one’s body accommodate the growth of the uterus and baby, and it helps one’s body prepare for childbirth by loosening the muscles and ligaments in the pelvis. Because of relaxin’s loosening effects on the muscles & ligaments, one may have a greater risk of injury from the overall decreased instability that it produces in the body. This is why it is necessary to continue doing safe and pregnancy-appropriate exercises to keep one as stable, strong,  and well-aligned in their body as possible. This is also why, as a prenatal yoga instructor, I emphasize elements of strength, alignment, and the use of props for safer and more supported postures. 

Below are 5 tips to consider when practicing prenatal yoga to support the effects of Relaxin on a pregnant body:

  1. Prop up Your Seat – I say often while teaching yoga that posture matters for every body but that for pregnancy it is a crucial matter. It is important that a pregnant person be able to find a neutral pelvic position when sitting (and standing too!). What this means is that their knees are slightly angled down from their hips (helps maintain a lengthened psoas muscles and tip the pelvis towards neutral) and their weight is mostly off of the tailbone or coccyx and just barely forward of the sitting bones or ischial tuberosities. While sitting, one’s low back lumbar curve should be slightly curved in, or slightly lordotic, which sets up the rest of the spine to be nicely aligned and presenting its neutral curvature. What does this have to do with relaxin? I see so many pregnant mamas who share with me that they’re feeling discomfort and achiness in their lower backs with often a feeling of surprise, because they’re only in the first trimester when not a huge amount of growth has occurred yet. Those in the first trimester of pregnancy especially need the necessary prop support to encourage optimal alignment while sitting due to relaxin’s high levels, which are peaking near the end of the first trimester. These high levels of relaxin create a scenario of decreased stability and greater mobility in the pelvis and spine that can lead to collapse and misalignment of the joints and ligaments if not appropriately supported. This may look like a person sitting with their weight dumping into their coccyx, which will present a rounding or deletion of the natural/neutral curvature in the lower back, and ultimately may lead to pain and discomfort. 
  2. Support Deep Stretches – I recommend that in most people long-held, unsupported deep stretches like that in Yin Yoga be avoided during pregnancy. This can place undue strain on the already loosened ligaments to possibly stretch beyond what is safe in that moment, potentially leading to greater degrees of instability in the body. Don’t get me wrong, stretching in pregnancy is important for establishing greater balance in the body and for helping the body prepare for labor but only within the body’s healthy stretching zones and with a focus of stretching the muscles versus the joints. While stretching in pregnancy, I highly recommend using props to help support stretches and to discourage reaching the zone of deepest stretch. I usually say something like, “enjoy this stretch to a place that feels like you’re reaching about 80-85% of your body’s maximum stretch potential.” If a stretch is being held for over a few breaths, I recommend that a prop be positioned in a way to help hold the stretch and discourage the body from collapsing into deep stretch that could place undue harm on the joints and ligaments. Here are some examples of using props in stretches:
    • Supta Padangusthasana 2 with a blanket or bolster underneath the outer thigh
    • Upavista Konasana with a blanket or two under the sitting bones (enough to establish a neutral pelvis) and a chair under the forehead 
    • Supta Baddha Konasana with some support underneath each thigh
  3. Include Pregnancy-Safe Toning Exercises – A pregnant person may benefit from including toning exercises in their practice like outer hip strengthening clam shells and other similar types of hip movements. I recommend trying these first with a certified prenatal yoga instructor or physical therapist who will know how to help you set up properly for these exercises so that you are targeting the desired muscles. I like to focus on the following muscles groups for pelvic stability:
    • Outer hips (abductors) – exercises include clam shells, fire hydrants from a table position, and side-lying leg circles
    • Inner thighs (adductors) – exercises include squeezing a block between the fronts of the inner thighs while standing in Tadasana (Mountain Pose) to encourage more internal thigh rotation (make sure that the butt is not clenching), squeezing a block between the knees while sitting on a chair (with great posture!), and wall sits while squeezing a block between the fronts of the inner thighs (see video below). 
    • Gluteal muscles in the buttocks – exercises include donkey kicks while keeping the hips as squared as possible and emphasizing lifting through the inner thighs and performing yoga postures with a strong attention placed in the heels, especially when doing chair postures or squats. 
    • Pelvic floor muscles – I encourage seeing a Pelvic Floor Physical Therapist to help you properly perform pelvic floor exercises, including knowing how to soften and fully relax the muscles. A prenatal yoga class may include simple exercise like inhaling while you soften and relax the pelvic floor muscles and gently engaging and lifting the pelvic floor muscles while exhaling for 5-10 breaths in a well-aligned seated posture or child’s pose (Balasana). 
    • Abdominal muscles – exercises include gentle belly breathing which entails inhaling while you soften the abdomen and gently hug your baby back towards your spine with your muscles as you exhale for 5-10 breaths. Once abdominal belly breathing is feeling well understood, try the Bird Dog abdominal exercise while hugging your baby back towards the spine for 3-5 breaths. 
  4. Use the Wall for Support & Postural Integrity – The wall is a wonderful prop anytime and especially in pregnancy. I will often create entire sequences with the back foot pressing against the wall for standing postures (see video below). Pressing the outer foot against the wall in standing postures like Triangle Pose (Trikonasa), Utthita Parsva Konasana (Extended Side Angle Pose), and Virabhadrasana 2 (Warrior 2 Pose) not only helps the pregnant yogi balance but it also recruits the inner thigh adductor muscles to turn on and support the pelvis as well as the major muscles in the legs, which results in an overall stronger and well-aligned posture. 
  5. Rest, Ground, & Reset – The high relaxin levels in early pregnancy contribute to there being an excess of the Ayurvedic dosha, Vata, which is often considered to be in excess throughout pregnancy, and may be even more so in the 1st trimester. There are 3 doshas, and the Vata dosha is associated with lightness, airiness, anxiety, and a feeling of being unsettled or ungrounded, among many other things. Practicing strong and well-aligned postures in pregnancy can help a yogi feel stable and strong in their bodies, which may translate as a quality of feeling more grounded and settled in the nervous system and body-mind. Another useful practice to help cultivate a sense of grounding is to actually rest deeply. Let the body relax deeply in restorative postures and Savasana variations. Allow the weight of your body to drop into the floor and feel the floor beneath you. Be patient in the process of rest. I encourage you to rest in a restorative posture like Supta Baddha Konasana for at least 10 – 20 minutes. You will most likely “wake up” feeling refreshed, renewed, and grounded.

See the chart of pregnancy hormones from: www.compoundchem.com

Low Blood Pressure in Pregnancy: 3 Tips to Consider While Practicing Prenatal Yoga 

Low blood pressure in pregnancy may leave a pregnant person feeling uneasy about doing the type of yoga that is currently most popular in the western world, which involves going up and down a lot throughout a medium to fast-paced yoga sequence. Many of us have had that sensation of getting up too fast from lying down or coming up from a forward fold in a yoga class, which has left us feeling like we may crash to the floor if we don’t sit down immediately. As a yoga teacher, I’ve seen the blurry looking focus of yogis that have come up too quickly, and thank goodness that no one has ever passed out in class. As someone who tends to air on the side of lower blood pressure, I’m very familiar with the signs and sensations of that almost passing out feeling. When I was pregnant, it was 10 times worse. When I had to pee during the night, which was about every hour or two, I’d have to sit on the edge of my bed for a few breaths, and then stand up and walk to the bathroom. I had to pause and feel my feet on the ground, and I carry that same practice of pausing and feeling the ground into my cuing in a prenatal yoga class. While low pressure in pregnancy can be a nuisance, its silver lining is that of pause and slowing down. It gives us a moment to embrace presence, to catch a glimpse of our rapidly changing babies, and to acknowledge our growing baby/ies.  

Low blood pressure in pregnancy is caused by the increased production of the hormone progesterone, which softens smooth muscle tissue, like that of the uterus and blood vessels. The progesterone is insuring that the uterus will be able to stretch as pregnancy progresses, and as it is widening the blood vessels, it is helping blood to circulate throughout the body. You’ve probably heard of or seen for yourself that radiant “glow” of a pregnant person, which is partly due to the increasing blood volume in their body. The extra blood flow can actually “glow” through the skin and make one appear to be slightly flushed giving them a vibrancy. Throughout a pregnancy, one’s blood volume will increase by 45%, and the blood vessels will need to be able to stretch and widen to accommodate this extra blood flow. 

The greatest dip in blood pressure occurs around 16 weeks of pregnancy, and it will gradually rise throughout the 2nd trimester and into the 3rd trimester. In my prenatal yoga classes, I’m making sure to include cues to especially keep those early 2nd trimester yogis aware of this drop and the sensations which it carries. 

Here are some tips to consider when practicing prenatal yoga with blood pressure that is lower than usual for you but still within normal range for pregnancy:

  1. Stand up slowly from forward folds & Lift your head – After being in standing forward bends like Uttanasana (standing forward fold) or Adho Mukha Svanasana (downward facing dog pose), come to standing upright very slowly. The steps I cue in classes are to: plant your feet (that means to pause and feel your feet), bend your knees, bring your hands to your knees, look forward or up (this is a really important step), roll your shoulders back, and when you’re feeling stable and not dizzy, press your feet into the floor to stand up. As an instructor, remind 2nd trimester yogis that they may need to stand up extra slowly. This slow method of raising is often necessary after a child’s pose (Balasana) as well. When it’s time to exit from Balasana, I recommend that you come to an all 4s table position and circle the hips or do a few rounds of cat and cow spinal movements. Then, make your way into the next posture. 
  2. Opt out of Lifting your arms if you’re feeling lightheaded – Some may decide to skip lifting their arms over head in certain postures if they’re feeling at all light-headed. When I instruct pregnancy sun salutations, we move quite slowly, but I still give the option once we’re standing to keep the arms down if one is feeling lightheaded or dizzy. Give the option to skip that move. 
  3. After inverting rest in Child’s pose – While I don’t teach inversions in prenatal yoga classes, if you are an intermediate to advanced yogi that is continuing to practice asanas (postures ) like Sirsasana (headstand), Handstand (Adho Mukha Vrksasana), or Inverted L-pose with the wall during pregnancy, after you’ve completed one, come to child’s pose or resting on the left side for one minute or more to let the blood return back into the lower extremities. This will feel gentle and loving to your body and the process of pregnancy. And, I encourage you to be honest with yourself if inversions are no longer feeling great to you. If they’re not serving your needs, omit them from your practice or swap them for Viparita Karani (legs up the wall) for 3-10 minutes with your low back on a bolster or the Spinning Babies Forward Leaning Inversion (only suggested after 20 weeks of pregnancy) for 3 breaths. See the instructions and contraindications here. If you decide to omit the yoga posture inversions from your prenatal yoga practice, they’ll be there for you when you’re ready after pregnancy. You have the rest of your life to enjoy inversions, if you so choose. 

If you’re pregnant and experiencing low blood pressure and dizziness, make sure you’re drinking plenty of water and electrolytes, and rest on your left side when you need breaks. Check-in with your pregnancy healthcare provider to make sure that your symptoms are within normal range and that it’s okay for you to practice yoga. 

See below the gentle progression from a forward fold to a standing Tadasana (mountain pose) that I instruct in prenatal yoga. It feels so good that even as I am now a mama 4 years postpartum, I still often take this much time  to stand up and pause in my yoga practice. Keep in mind too, blood pressure is usually on the lower end during the first 6 months postpartum as well. So, practice slow and mindful standing up in your postpartum and baby and me yoga classes too. 

SEE VIDEO BELOW FOR SAFELY STANDING FROM A FORWARD FOLD DURING PREGNANCY YOGA

5 Tips for Practicing Yoga to Cope with Nausea in Pregnancy

By Sarah Gorham Silverman of Baby Moon Tri-Fit

While many people may not be able to tell on the outside that a person is pregnant in their first trimester, it is often the most challenging trimester of pregnancy, the primary reason often being nausea. And, let’s please not call it “morning sickness,” because nearly every mama that I’ve met going through this is experiencing it throughout the entire day. 

Before I get going about this topic and how a yoga practice may best support a person struggling with pregnancy nausea, I’d like to offer a support tip or two. As well intentioned as it may be, if you’re reading this and you have not ever experienced pregnancy nausea, I urge you to NOT ask the miserable nauseous person if they’ve tried ginger. We’ve heard of that technique to help nausea, and it does very little. It’s still worth a try and may take the edge off of nausea, but its effects don’t last long for most of us. A wonderful way to support a pregnant person experiencing nausea is to pause and hear them, and if it’s appropriate, maybe give them a nice hug. We just need to be heard and feel like we can be in a space where it’s ok to say that pregnancy sometimes really sucks. 

How every person encounters pregnancy and the common symptom of nausea will be unique , but there is often some common ground, so I’ll share a bit about my pregnancies. During my past pregnancies, I began feeling the first hints of nausea about five days before my first missed period. From that day on, it slowly got worse until it peaked (when it’s at its worst), which in pregnancy number 1 was around 12 weeks, and in pregnancy number 3 around 15 weeks. I had another pregnancy in between those, which resulted in a miscarriage, and even though the embryo was not properly developing and passed around 6 weeks, I still felt nauseous  until the pregnancy had to be terminated at 11 weeks. The nausea in my first pregnancy felt gross but rarely resulted in vomit. I just felt pretty shitty all day, and it got the most unpleasant at night. Eating definitely helped, and an empty stomach exacerbated symptoms, so I had to have crackers or a banana with me at all times.  Nausea in my third pregnancy began as early as in the first one (before first missed period = 3 weeks pregnant), and it got to be quite miserable by six weeks pregnant. I could rarely hold down food; exercise was dreadful, and I felt it 24/7. What got me through this time was Einstein’s Bagels and an iPad that my 2 year old and I watched together while lying on the couch. It was during the pandemic, so there was little support around us. Despite my wishful thinking that it would peak at 12 weeks, like the internet said on website after website, it finally began decreasing around 18 weeks of pregnancy and was mostly gone by 23 weeks. Up until this time, I had been pretty depressed and upset most days and was not enjoying pregnancy whatsoever. I was taking Unisom, which helped lessen my symptoms and kept me from vomiting as much. This was a very challenging time, and I know people who’ve had much worse nausea and vomiting, some of which have to be hospitalized for fluid IV replacement, also known as hyperemesis gravidarum. 

Here are some facts about nausea in pregnancy. 

Nausea during pregnancy may be mild to severe lasting for short segments of the day or all day with or without vomiting. Eating regularly often decreases its intensity. Pregnancy nausea and vomiting decreases for many around weeks 12-14, and for many others may continue for another month or two, or for some their entire pregnancy. This improvement could be due to the 30% drop in hCG  (human chorionic gonadotropin) levels. It is unknown what exactly causes nausea and sickness, but it has been linked with low blood sugar, increased secretion of bile, and raised levels of the hormones hCG and estrogen. 

See the chart below illustrating the changing levels of Estrogen, Progesterone, and HCG in early pregnancy. 

A New Yoga Practice for Pregnancy (all images of postures listed in this article are at the end)

Practicing yoga during pregnancy can be wonderful and may help manage symptoms of pregnancy nausea, but it’s important to be practicing in a way that does not exacerbate symptoms. 

Here are some things to consider when exploring Prenatal Yoga to help manage or cope with pregnancy nausea:

  1. How you feel going up & down: Notice how you feel after going up-and-down frequently, as you may do during a Sun Salutation (Surya Namaskar) or when coming in and out of Downward Facing Dog Pose (Adho Mukha Svanasana). This up-down movement may not be an issue for some, while in others it may increase nausea and lead to vomiting. A nice alternative to Downward Facing Dog Pose is L-Pose using the wall. For some in the first trimester, the increases in progesterone are already softening the esophageal sphincter and causing some acid reflux, which can also be exacerbated by going upside down when this symptom is active and may increase one’s risk of vomiting.
  2. The Intensity of a Yoga Practice: Invite yourself to slow down if you’re used to vigorous types of yoga. You can go back to your vigorous practices after pregnancy, and you may find that there can still be a nice level of intensity in a slower practice. For those facing pregnancy nausea, vigorous movement may make them feel worse and depleted. Think quality over quantity. Invite yourself to take out some Sun Salutations and/or “vinyasas”. Your practice does not need to “flow” to connect postures. Instead try a handful of standing postures like Tadasana (Mountain Pose), L-pose with the wall, Trikonasana (Triangle Pose), Utthita Parsva Konasana (Extended Side Angle Pose), and Ardha Chandradana (Half Moon Pose – I recommend with your back to a wall). Long-time and expert prenatal yoga teachers, Linda Spackman and Linda Sparrowe, recommend Ardha Chandrasana for relieving nausea. Hold the postures while slowly breathing for 2-5 breaths, depending on the intensity level for which you’re looking. 
  3. Consider a Practice off of your feet: If your nausea is severe, you may need to do a mostly seated or supine practice and stay off of your feet. Maybe you do one or two standing postures like Trikonasana (Triangle Pose) and Ardha Chandradasana (Half Moon Pose) at the wall, and the rest of your practice is on the floor. The Supta Padangusthasana (1-3) series is fantastic for the 1st trimester and nausea, and it is also the perfect way to prepare for Trikonasana and Ardha  Chandradasana. Keep in mind that deep twisting is NOT recommended throughout pregnancy and especially not in the first trimester, so keep Supta Padangusthasana 3 mild and mostly focused on releasing the outer hips. Moving through asanas (postures) on your back can be quite transformative for the body-mind. They allow energy to shift in your body, increase circulation through the body (including the uterus), and they serve as a method of slowing down and being in the present, which results in a feeling of calm. 
  4. Consider doing more Restorative Postures: For severe nausea, your entire yoga practice may need to be fully composed of restorative postures. These are long-held (5-15 minutes depending on the posture) postures that are supported by props, like bolsters, blankets, and props to aid in gentle openings and deep restoration. Supta Baddha Konasana (Supine Bound Angle Pose) and Viparita Karani (Legs up the Wall) are great examples of restorative postures for pregnancy. 
  5. Consider Pranayama: Breathing exercises (pranayama) are highly recommended in pregnancy so that the pregnant yogi receives the shift of awareness and energy that often occurs as a result of mindfully breathing. Pranayama leaves one feeling calm and in a state of greater ease and presence. It often cools down nausea and helps the pregnant person rest more deeply and fully, so these are great to do just before the final rest of your yoga practice and right before bedtime. Try gentle pranayama exercises like:
  • Sitali – inhaling slowly through the roll of your tongue and exhaling slowly with the mouth closed. 6-10 rounds. 
  • Nadi Shodhana – inhaling slowly through the left nostril, exhaling slowly through the right nostril, inhaling slowly through the right nostril, and ending the round by slowly exhaling through the left nostril. Repeat the full round 3-4 times. 
  • 3-part breathing – inhaling slowly into the belly and low back, then into the ribs, and lastly into the front and back of the chest. Exhale slowly and fully. Repeat 6-12 times. 
  • Bhramari Pranayama (Bee’s breath) – Close the eyes and gently plug the ears. Inhale through the nose slowly, and exhale slowly while humming. Repeat 5-7 times. 

Supine and seated postures, restorative postures, and pranayama may be the focus of one’s practice during this time. Some may feel a decrease in nausea through movement and gently using their muscles, while some may require more restorative types of postures with little movement.

Try a few different types of prenatal yoga practices and give yourself the space to examine which types feel the most supportive to your body-mind and the process of nurturing a developing embryo and fetus. 

Try out the sequence below and tweak it according to your needs.

  1. Seated Hip Stretch (Agnistambhasana variation): 1-2 minutes each side.
  2. Supta Padangusthasana 1 (with heel reaching towards ceiling) & 2 (as shown in image below) w/ an inclined bolster after 14 weeks pregnant, can flat on back prior to 14 weeks: 1 minute for 1 & 2 on each side.
  3. Baddha Konasana w/ 1-2 blankets under seat: 6 breaths.
  4. Prasarita Padottanasana: 4-5 breaths.
  5. Trikonasana: 2-5 breaths.
  6. Utthita Parsva Konasana: 2-5 breaths.
  7. Ardha Chandhrasana: 2-5 breaths
  8. Supta Baddha Konasana, incline after 14 weeks pregnant: 5-10 minutes.
  9. Viparita Karani w/ low back on bolster, if undergoing fertility treatments this can help improve fertility, but check with your provider before you try this to make sure they approve: 3-10 minutes.
  10. Sitali Pranayama: 6-12 breaths
  11. Left Side-lying Savasana: 5-10 minutes.

4 Techniques for Managing Pain in Childbirth that we do in Prenatal Yoga

Prenatal Yoga & Pain Management 

I think most would agree that labor is painful. Having the expectation that it will be painful going into it, I think, is useful and will less likely lead to failed expectations, if one is going in expecting a mildly painful experience full of bliss. Pain can be tricky. It’s typically signaling to us that something is wrong, and we need to stop doing that thing. The pain of labor is completely normal and is usually a sign that things are progressing, that the cervix is changing, and that the uterus is contracting stronger and stronger. 

In their book, Mindful Birthing, Nancy Bordacke uses the term Transformational Pain to describe the normal sensations that one experiences during labor. Bordacke says,

“We need a completely different category for the pain of childbirth, so I offer the concept of transformational pain. Transformational pain is normal pain.  It is the pain of living in a mortal body, a body that exists in Horticultural time, a body that is birthed, grows, at times experiences illness, the eventual pains of aging, and ultimately death. Physical pain is just part of the business of being alive. When we give birth, change is taking place very rapidly – anywhere from a few hours to a day or more – and when a body changes so quickly, we experience intense transformational pain.”

Often the fear of pain initiates the “fight or flight” response to take hold of our bodies. When this happens in labor, the increased production of adrenaline by the hypothalamus crowds out many of the body’s natural coping chemicals, oxytocin and endorphins. In addition, blood circulation increases outwards towards the extremities of the body and away from the organs in the central region of the body, including the uterus. The decreased circulation in the uterus can make uterine contractions slow down and lose their rhythm and cause contractions to be more painful. 

The practice of Prenatal Yoga utilizes many techniques to help a person cope with uncomfortable and sensational moments.

Some of these include:

  • Breath observation. Simply observing the breath can be an incredibly powerful tool when it comes to pain management. As mentioned above, often the fear of pain initiates the stress response to send adrenaline coursing through the body, getting it ready to fight or flee, and involves an elevation in the breath pattern with more shallow exhalations. When one is in the practice of witnessing their breath, they will be able to better catch when their breath pattern has changed and begin taking deeper breaths with longer exhalations. A deeper breath also involves breathing downward and outward versus up high in the chest. Breathing in this way will allow their body to get back into its parasympathetic state of greater peace and the state of mind that is ideal for laboring and allows pain coping chemicals to be released. 

Throughout a prenatal yoga class or session, there are many reminders to observe the breath while moving and resting, and various types of breathing exercises are practiced to help calm the body. People often ask in prenatal yoga, how should I breathe during labor, and my answer is usually to breathe normally and to stay cognizant of the breath so that it can be there to support you through challenges. If you notice that your breath is becoming shallow, encourage yourself to slow down your breath and keep the exhales complete. 

  • Practice how to Relax. As easy as it sounds, relaxation can be quite challenging sometimes. While our partners or friends may have the best of intentions when they say, “Just relax,” this may be quite triggering for some and bring on the opposite results. Sometimes we may also think after a few minutes of wiggling around in a restful posture or trying to sit quietly, “I’m not very good at relaxing,” but all this means is that we need to figure out how to relax. The simple meaning of Yoga is Union. This can be understood as a union between the body and the mind. The mind is the body and vice versa, but often in life, we may feel like the mind is sprinting all over the place and have little awareness of the actual physical body. 

There are many ways to bring the mind back into the body, where union and therefore relaxation occurs, but I usually encourage people to start by observing their breath. 

  • Explore Coping Techniques in Challenging Postures. Many prenatal yoga postures and exercises can be physically challenging. While these pregnancy-safe exercises are providing tone and pelvic stabilizing opportunities, they are also giving the pregnant person a practice round at being in an uncomfortable position and needing to figure out a way to cope that suits them best. It may be counting the breaths, or softening the face and shoulders, or repeating a phrase or word that also matches their long rhythmic breathing. There are endless techniques, and we explore many of these in classes and sessions. The practitioner begins to hone in on which ones work for them in the midst of challenge and which ones do not seem as useful. We often experiment with techniques in the “Wall Sit” while squeezing a block between the upper inner thighs. We may begin with shorter holds of around 30 seconds for 1-2 sets, and then we’ll gradually build into 2 sets of 1 minute each, about the length of an active labor contraction, and building up to 90 seconds to 2 minutes long, more the length of transition contractions, for 1-2 sets. 
  • Build Focus in Pregnancy-safe Kundalini Exercises. This last area of focus builds from the previous method. Kundalini sets or Kriyas typically involve doing 1 thing repetitively for a few minutes or more. Some pregnancy-safe sets include calf-strengthening by moving onto the tippy toes and back down, for a few minutes, circling the arms for a few minutes, or coming in and out of the deep squat, Malasana, for a few minutes. There are numerous ones to try, and most of them require much focus and motivation to get through. Once the exercise is complete, there is a sweet moment of rest where the practitioner may experience the release of pain-relieving endorphins that sometimes feels “blissful.” Labor offers these natural breaks between contractions, and this is how one may experience bliss during childbirth – by riding the wave of endorphin release caused by the pain experienced in contractions followed by a short rest to feel and be in the moment. 

The Forward Leaning Inversion is not Only for Breech Babies!

I wish I’d known more about this technique to set myself up for my past labors and to possibly help when one of them stalled at 8-9 cm dilation! The Forward Leaning Inversion, a Spinning Babies technique, is not only recommended to use for breech babies, which is what I used to think, but also to potentially establish a fetal position that may help labors progress more smoothly and quickly. 

My first labor had a fairly smooth labor progression up until I reached 8 cm. It began around midnight, and by around 3 pm the next day, my midwife was measuring that I was 9 cm with a bit of a “lip” left on one side of my cervix. I had been moving around since labor began in positions that I often recommend, like an all 4s table position while circling my hips, child’s pose in between contractions when I was tired, and I spent much time in my birthing tub once I reached about 5 cm of dilation. I was encouraged to try squatting over the toilet during contractions to see if that “lip” would fully dilate. After several hours of trying this and being in excruciating pain. I decided to go to the hospital for an epidural. On my way to the hospital, I closed back up to 8 cm. Who really knows if trying more Forward Leaning inversions prior to labor would have set me up for a more balancing opening of my cervix, or if trying it once this stall began would have resolved the “lip,” but I do wish it had been a technique in my toolbag to at least consider. I think the toilet posture was a great suggestion by my midwife that would have been more successful along with the Forward Leaning Inversion and the Side Lying Release. This article is only about the Forward Leaning Inversion, but I also know now that I probably had a pelvic floor imbalance (tighter on one side) that the Side Lying Release from Spinning Babies could have also helped break this stall or prevent it. Read more about the Spinning Babies Forward Leaning Inversion below, source website at the end. 

Below info taken directly from Spinning Babies website – see website for instructions for how to safely practice & to see list of contraindications. 

The Forward Leaning Inversion posture from Spinning Babies, put simply, is a technique that creates room in the lower uterus. The baby can then use that space—with the natural pull of gravity—to snuggle into a more ideal position for birth. The Forward-leaning Inversion technique comes from Dr. Carol Phillips, DC who teaches Dynamic Body Balancing.

The Forward-leaning Inversion potentially makes room for a good fetal position by untwisting any ligaments to the lower uterus and cervix that may be wound up from sudden stops or a twisted posture.

Kneeling afterward also allows temporarily lengthened ligaments to align the uterus with the pelvis. The cervix may become less tipped or tight and then be able to let the baby’s head position better, and the cervix to dilate in labor more easily.

This technique may also reduce back pain, hip pain, or tailbone pain. Improved fetal positioning does occur too. It is a very worthwhile activity because simply turning the baby’s head down is a notable achievement in and of itself.

When to NOT do it:

  • If medical contraindications exist for going upside down, such as high blood pressure or another risk of stroke
  • If you have heartburn, glaucoma, or hypertension
  • In cases where amniotic fluid levels are unusually large and the doctors are worried and measuring weekly
  • If you have a sinus infection and going upside down is especially uncomfortable
  • Right after eating, to avoid potential heartburn
  • If there is a suspected or known problem with the placenta in pregnancy, including bleeding
  • If you have uterine pain of an undetermined origin. If this is the case, get assessed immediately
  • If the baby is having, or has had, frantic vigorous movements. Be sure to have the baby assessed immediately
  • If the inversion causes unexpected pain. (Remember, your head may pound a bit for the first few times, but that’s normal.) A severe headache should be evaluated by a physician immediately
  • If your labor is progressing normally. Enjoy your labor
  • If there has been abundant fluid in labor and the baby is high at -2 station or above, and the water has released with the baby’s head high (in which case, open the pelvic brim with Walcher’s or a variation of Walcher’s)
  • If you simply don’t feel that this is right for you (always trust the mother’s intuition and respect her choice)

Before practicing this technique, read all about it at: https://www.spinningbabies.com/pregnancy-birth/techniques/forward-leaning-inversion/

10 THINGS TO DO IN BABY & ME YOGA

10 THINGS TO DO IN BABY & ME YOGA

The first and largest accomplishment is arriving. It’s no small task to get packed and leave the house with a baby, but I promise you that it will be worth it! Give yourself plenty of time to arrive so that you have some time to set up and acclimate you and your baby to the space, whether you’re joining in-person or online. 

Before class begins is a nice time to meet and chat with the instructor and other mamas and parents. A yoga practice is all about “arriving” into the body and into the present moment, so let yourself go through this process in the room (the physical or virtual). 

Now, actual “things” that we do in class:

  1. Viparita Karani with the low back raised on a bolster. Not only does this restorative posture just feel great, but it has a long list of unique benefits for most humans, especially those who’ve birthed babies. This rejuvenating posture is great for “women’s health” and is one that I almost always sequence into postpartum and baby & me classes (as long as a person is not on their period). This gentle and passive inversion allows mamas and daddies the opportunity to receive the nervous system calming effects of having the body positioned in a mild inversion. These include parasympathetic nervous system stimulation to help calm the often frazzled nerves of new parents, enhanced circulation to the pelvic region and uterus, which aids in postpartum recovery and overall feelings of wellness, enhanced circulation to the heart, lungs, throat, and head, which among many things helps aid in proper functioning of the thyroid and pituitary glands, which are crucial for hormonal balance and fertility, and helps the abdominal and pelvic floor muscles to gently lift and lengthen, which improves their recovery and functioning. It is sometimes a challenge to get the low-back on the bolster, especially if there is a baby on the lap! If you’re unable to get your back up on the bolster, start out doing Viparita Karini without a bolster. Hold the posture for as long as it feels great to you, 3-15 minutes. 
  2. Ribcage-Focused Breathing is a gentle way of breathing that encourages us to utilize every region of the lungs. We do this by focusing on the ribs moving or “blossoming” open to the sides, back, and front of the ribcage with each inhale and softening back in and down with each exhale. This helps the diaphragm move maximally up and down (as it should) with the breath and gently restores core muscles while soothing the nervous system. This type of breathing is revisited throughout class, and it feels great!
  3. Gentle Hip-Opening Postures, like Eka Pada Raja Kapotasana PREP variation (Pigeon Pose Prep), Agnistambhasana (Firelog Pose) variations with one leg or seated on a chair, or Tarasana (Diamond Pose). All of the postpartum sitting involved in feeding and caring for a newborn baby results in tight hips for many new parents, which echoes through the body and usually leads to other imbalances and discomfort. 
  4. Thigh & Hip Flexor Stretches. Hip flexors are shortened and tight in many new parents from all of the sitting that we do in caring for our babies. It’s kind of like the body is a little stuck in a seated position, so we need to do things that are the opposite and take our bodies out of that seated position. Some postures that we do in Baby & Me Yoga to help lengthen the fronts of the thighs and the hip flexors include: Pigeon Pose followed by an easy thigh stretch that involves pulling the heel up towards the buttocks. I do this variation of allowing the bottom to completely drop to the floor on one side versus the “traditional” posture of keeping the bottom off of the floor to avoid the high possibility of a postpartum body collapsing and overstretching the ligaments and joints, which are still affected by the hormone relaxin, and would therefore place unnecessary  stress on them, possibly leading to more pelvic instability, pain, and injury. Go easy. We want to target stretching the actual muscles and avoid any collapsing into postures, which is important in all bodies but especially so in bodies who’ve recently birthed babies. 
  5. Gentle Low Back Openers. Many mamas come to class hoping for some of their low back stiffness to be alleviated. Postures we do in class often include: Balasa (Child’s Pose), Adho Mukha Svanasana (Downward Facing Dog Pose) variations, Uttanasana (Standing Forward Fold) with bent knees and a lengthened low back, Paschimottanasana (Seated Forward Fold) with a lengthened low back, and Tarasana. 
  6. Singing Songs to Your Baby along with the class when you’re in postures that do not compromise your body. This is the perfect time for you to gaze into your baby’s eyes while they enjoy hearing your beautiful singing voice, which no matter how you think you may sound, your baby is deeply soothed by hearing your voice. The heart rates of babies slow down when they hear the familiar voices of their parents and caregivers. Singing also stimulates the vagus nerve which helps us relax and be in the moment.
  7. Mindful Walking for a few minutes inside or outside, if the weather is nice. The practice of mindful walking can be a wonderful way to see how mindful breathing and feeling the feet landing on the ground can be inserted into any part of one’s day, even during those long nights of little sleep or those challenging moments of growth and transition in your baby (and yourself). A few minutes of mindfully walking with your baby may be an invitation to remember to take, even 1, deep breath during a hard moment of parenthood. This won’t make the challenge disappear, but it may soften the edges and help us get through the time. Notice how your baby responds when you drop into your body. And, know that this won’t always be the case. 
  8. Downward Facing Dog with the Feet Together, the knees bent, high on tippy toes, and the bottom super high. This inverted position helps one access and tone their inner thigh (adductor) muscles, the pelvic floor muscles, and the low belly muscles (transverse abdominals). It also gives the belly tissues and uterus a little lift and a break against the usual pull of gravity and helps the front body and chest also lift and open, which often feels nourishing and energizing. We often build into variations of dog on tippy toes and on a block against the wall, and when one is feeling strong and open enough over time, they may choose to eventually walk their feet up the wall hip height for an inverted L pose. 
  9. Chest and Shoulder Openers are the number 1 types of postures that participants in Baby & Me classes recommend. The feeding and caring demands of the first year (or few years) of a baby’s life are extremely hard on the caregiver’s body. Already, from nearly a year of pregnancy, a person’s chest and head has, most likely, been pulled forward by their growing baby and breasts, which has compromised their natural spinal curvatures, and thereby placed strain on the shoulders and neck regions. Similar patterns usually get carried into early motherhood, as a mama is looking down, holding, and caring for their little one almost constantly. The body may also not be getting proper rest for some, so recovery and healing may be taking an extra long time. This leaning forward position not only feels crappy, but it also decreases circulation to the breast area, which may affect milk production, and it decreases circulation and tone around the throat and thyroid gland region, which could have an impact on fertility and one’s overall state of having “energy” and feeling well. Simple postures, like a supported bridge pose, that help to gently open the chest and shoulders and align the neck and head are a must in postpartum classes. 
  10. Block-Squeezing Utkatasana helps strengthen the inner thigh adductor muscles and stabilize the pelvis. One meaning of “stabilize” in this context is that by squeezing the block evenly from both inner thighs, the muscles are becoming symmetrically strong and other asymmetries around the pelvis may begin to shift into a more ideal place. The adductor muscles are one of many muscles that play a role in “holding together” the pelvis, and these muscles coordinate with the pelvic floor group of muscles and abdominals too – all muscles that are crucial in pelvic and spinal support. This intense posture allows one to feel how strong they are, which can bring a sense of energy and confidence to a new parent, which is so valuable in the first years of parenthood when we often question many of our decisions and ability to parent. We usually “swish” around colorful scarves while doing Utkatasana, which makes it much more entertaining for mamas and their babies. 

Well, there you have it. This list could go on, but I’ll leave it at a nice and even “10.”

Postpartum and Baby & Me Yoga classes are offered weekly virtually and in-person in Albuquerque, NM. Baby & Me classes are geared towards those who’ve been fully cleared to exercise by their healthcare providers and for babies who have not yet begun crawling quickly. Baby Moon Yoga classes welcome all mamas, daddies, and caregivers. 

Anna Flipped Her Baby! – & That’s Just the Beginning

Anna Flipped Her Baby! – & That’s Just the Beginning

This is Anna. Her baby was in a transverse lie position (sideways), which by most providers necessitates a C-section for safety reasons, up until this past week when he rotated into a head-down position at 36 weeks. Anna was thrilled, because she is hoping to birth her baby without surgery. She believes her baby rotated during or right after prenatal yoga (the day before she’d had an ultrasound that still showed him transverse), during which we’d practiced a balanced session that  included many postures to help cultivate mobility in and around the whole pelvis. When a pelvis is mobile, it’s just one more piece of the puzzle that can help a baby move into a space that may propel a labor to go more smoothly and quickly. The baby’s head will be able to move and rotate allowing it to drop deeper into a pelvis (and out!), like a lock finding its way into a key (a Gail Tully analogy).

We do many postures in prenatal yoga to promote balance and mobility in the whole body. These include: 

Outer hip-openers like Agnistambhasana (Firelog) variations. My favorite one of these that I recommend daily for most human beings is the accessible variation with one’s buttocks scooched towards the edge of a chair seat (pictured below). Make sure that your weight is tipped towards the fronts of the sitting bones versus towards the tailbone for maximum benefits. Breathe slowly and hold for at least 1 minute on each side.

Agnistambhasana variation with a chair.

Inner thigh & pelvic floor softening, which are touched on in many prenatal yoga postures like Parsva Konasana (many great prenatal variations in the Silver Moon Yoga Syllabus of postures), Trikonasana, Baddha Konasana, Malasana, side lunges, and one of my favorites is a passive variation of Upavistha Konasana with the forehead resting on a chair (pictured below). Add in horse lips releasing breath for maximal release in the jaw, tongue, and pelvic region. Sit on enough props so that your weight is slightly tipped forward of the sitting bones. Breathe slowly and hold for 1-3 minutes.

Low back opening and lengthening, which can be accomplished in forwards folds like Paschimottanasana (legs wider apart for pregnancy), Uttanasana (legs wider apart for pregnancy), Tarasana, Adho Mukha Svanasana variations (including using chair & wall), and the Spinning Babies’s Forward Leaning Inversion (pictured below), which also helps release ligaments that connect the uterus to the sacrum = opening the “sacred doors of the pelvis” – Gail Tully. Make sure in seated or standed forward folds that the knees are bent enough to keep the lower back long versus excessively rounding the back.

Thigh and hip flexor stretches like a side-lying thigh stretch, Parsva Konasana, and lunges, which have many variations. I’ve pictured one below using a chair.

In a 1:1 private session, I’d throw in a few minutes per side in the Spinning Babies Side-lying Release as well as their recommended Body or Fascia Jiggling and the Standing Sacral Release.

It’s ideal if any yoga postures are practiced with an experienced prenatal yoga teacher who has a well-trained eye on proper alignment and form for pregnancy. These postures will probably have some element of challenge but should overall feel fantastic and useful to the pregnant practitioner.

Anna has been coming to classes bi-weekly since early on in her pregnancy, and for the past few weeks has been practicing at home some of the things that we do in class like the Forward Leaning Inversion, the chair outer hip-opener, and ball circling. Way to go Anna! You made the space in your uterus for your baby’s head to slide into! 

This is Anna’s story, which is not meant to be set as an expectation that these movements will do this for all bodies, but more as a reminder that they can and often do work. Some pregnant people may need to do them way more than another birther. We are all carrying and examining unique body stories. 

Founder of Spinning Babies, Gail Tully, says that a head-down position is only half of it. The placement of a baby’s head-down position and whether it will be able to tuck its chin and rotate through the pelvis is another huge and nuanced factor in the birthing equation. Another factor is that there are many variations of pelvic shapes which combine in unique ways that make no pelvis exactly like another one. The most predominant variations lie in the shape of the pelvic inlet, which means that each baby will have its unique journey of moving or engaging in the pelvis. A mobile pelvis will allow babies to move and spin as they need to to make their way through the pelvis and into the birthing canal and out into the world. I hear many people saying things like, “I’m all set; my baby is in a head-down position, so I’m ready for labor!” I absolutely love this confidence, but where it’s appropriate I try to encourage pregnant yogis to keep moving and opening and coming to yoga as long as it’s still feeling supportive. The baby’s journey has only just begun!

Therefore, the fusion of prenatal yoga that I usually teach is not only intended for those attempting to turn their baby from a breech position. It’s also great to encourage a nice head positioning once a baby is already head-down. Above all, I encourage pregnant yogis to move in ways that feel nice and that align with their body’s wisdom and intuition. Birthers often can feel what types of movement are beneficial to them when given the space to explore, listen, and feel. 

I combine yoga concepts of safe alignment and form, restful and relaxing postures, and breath awareness practices with some Spinning Babies theory in my classes and private sessions. Beginning yoga before pregnancy is ideal, but if you’ve already passed that, come as soon as you’re feeling up to it. 

The Spinning Babies website offers great step-by-step instructions on how to do many of their recommended exercises. 

I hope to see you in class! It meets in-person and virtually. 

Registration for Prenatal Yoga Teacher

A person who is eligible for registration as a Prenatal Yoga Teacher through the Yoga Alliance has completed at a minimum both a 200 hour yoga teacher training and an 85 hour prenatal yoga teacher training from registered yoga schools. Once the person has completed these registered programs, they need to teach at least 30 hours of prenatal yoga. I taught prenatal yoga for many years with only having a 15 hour weekend prenatal yoga teacher training, but as I put in the years of extra training and attended more workshops and trainings specifically dedicated to prenatal yoga, I have become a much more knowledgeable, safer, and useful prenatal yoga teacher. I cringe at some of the things I used to do in my prenatal yoga classes with my limited training. I completed a year-long labor doula program, which focused heavily on the birthing process alone, but this would not provide much help in prenatal yoga. If you’re considering prenatal yoga, it may be wise to find out what kind of trainings your instructor has so that you can get the maximum out of your prenatal yoga sessions while you’re pregnant. You may find that your teacher is great without having these trainings, but it may be something useful to look into. Many prenatal yoga teachers with online videos and live classes are not registered and have had very little training, if any, dedicated to prenatal yoga.

Top 10 Reasons to do Prenatal Yoga: It’s Beyond What You Might Think

Top 10 Reasons to do Prenatal Yoga: It’s Beyond What You Might Think

A person’s prenatal time is one of beauty, joy and often challenge. Prenatal yoga, under the guidance of a well-trained and careful instructor, provides benefits to the birthing person and pregnancy far beyond simple rest, relaxation and stretching.  Though these too are important and beneficial, this is just the beginning.

The list below is simply a list, without ranking order, of many of the benefits that a birthing person may receive from practicing prenatal yoga throughout their pregnancy. The benefits exceed what I’ve written here.  

Continue reading “Top 10 Reasons to do Prenatal Yoga: It’s Beyond What You Might Think”